RESTful Issue Tracking Application With Spring Boot and AngularJs
In this tutorial I’m going to create a RESTful Service Application with spring-boot, spring-jpa, hsqldb, AngularJs.
You can download the source from Github.
Maven is the only requirement for this tutorial. You may also want to use an IDE like Eclipse. Currently I have Eclipse Neon for Java EE Developers
Outline
Section 1 : Creating a project using Spring Initializr
Let’s first create our project structure using “SPRING INITIALIZR” from https://start.spring.io/
I am going to generate a Maven project with Spring Boot 1.4.0 (which are selected by default).
Second step is to write a group name for the project.
Mine is com.ferdisonmezay and the artifact is issuetracker
So the package names of this project will start with com.ferdisonmezay.issuetracker
Then we need to select the dependencies: you can do this by typing the names on the ‘Dependencies’ text field, or you can also click on ‘Switch to the full version’ link and select all the dependencies you want to use.
For this application I will use :
-
Web
-
Jersey (JAX-RS)
-
JPA
-
HSQLDB
After you select these dependencies, click on Generate Project button. Your project files will be generated and downloaded.
Now extract the zip file you’ve downloaded and cd into extracted folder and run
mvn spring-boot:run
Our spring boot application should be started. Now if you open your web browser and go to http://localhost:8080/ you will see Whitelabel Error Page, which means our application runs, and we didn’t map anything yet.
Now I’m making a commit to github, Commit Message : initial project, downloaded from spring.io
Section 2 : Creating Web UI
In spring boot web applications we can serve websites as well. We need to put our web UI related files into src/main/resources/static folder.
I will copy-paste css, javascript, image files to static folder. Then I’ll create an index file to display website content.
Here is the folder structure after copy-paste.
static
├── css
│   ├── font-awesome.min.css #for icons etc.
│   └── main.css #for UI styling
├── fonts
│   ├── FontAwesome.otf
│   ├── fontawesome-webfont.eot
│   ├── fontawesome-webfont.svg
│   ├── fontawesome-webfont.ttf
│   ├── fontawesome-webfont.woff
│   └── fontawesome-webfont.woff2
├── images
│   ├── banner.jpg
│   ├── logo.png
│   └── logo_big.png
└── js
    ├── angular-route.js
    ├── angular.min.js
    ├── bootstrap.min.js
    ├── custom.js # website custom js functions for scroll animations etc.
    ├── jquery-1.12.4.min.js
    └── jquery.easing.min.js
now we need to create index.html file in static folder.
<!DOCTYPE html>
<html>
  <head>
    <meta charset="utf-8">
    <meta http-equiv="X-UA-Compatible" content="IE=edge">
    <meta name="viewport" content="width=device-width, initial-scale=1">
    <title>Ferdi Sönmezay | Rest Application</title>

    <script type="text/javascript" src="./js/angular.min.js"></script>
    <script type="text/javascript" src="./js/angular-route.js"></script>

    <link rel="stylesheet" href="./css/main.css">
    <link rel="stylesheet" href="./css/font-awesome.min.css">

    <!-- HTML5 Shim and Respond.js IE8 support of HTML5 elements and media queries -->
    <!-- WARNING: Respond.js doesn't work if you view the page via file:// -->
    <!--[if lt IE 9]>
       <script src="https://oss.maxcdn.com/libs/html5shiv/3.7.0/html5shiv.js"></script>
       <script src="https://oss.maxcdn.com/libs/respond.js/1.4.2/respond.min.js"></script>
   <![endif]-->
</head>

  <body>
    <header class="site-header">
      <div class="wrapper">
        <nav class="navbar navbar-default navbar-fixed-top" id="mysiteNav">
          <div class="container">
            <div class="row">
              <div class="col-md-4 col-sm-4 col-xs-12 col-lg-4">
                <div class="navbar-header">
                  <button type="button" class="no-space navbar-toggle collapsed pull-right" data-toggle="collapse" data-target="#navbar" aria-expanded="false" aria-controls="navbar">
                    <i class="ion-navicon collapsed pull-right"></i>
                  </button>

                  <a class="navbar-brand-logo" href="./">
                    <div class="row">
                      <div class="col-md-1 col-sm-1 col-xs-1 col-lg-1">
                        <div class="logo">
                        	<img src="./images/logo.png">
                        </div>
                      </div>
                      <div class="col-md-11 col-sm-11 col-xs-11 col-lg-11">
                        <div class="brand collapse navbar-collapse">
                        	FERDİ SÖNMEZAY
                        	<p>Restapp</p>
                        </div>
                      </div>
                    </div>
                  </a>
                </div>
              </div>
              <div class="col-md-8 col-sm-8 col-xs-12 col-lg-8">
                <div id="navbar" class="collapse navbar-collapse">
                  <ul class="nav navbar-nav pull-right">
                    <li><a class="page-scroll" href="#/home">Home</a></li>
                    <li><a class="page-scroll" href="#/developer">Developers</a></li>
                    <li><a class="page-scroll" href="#/bug">Bugs</a></li>
                    <li><a class="page-scroll" href="#/story">Stories</a></li>
                    <li><a class="page-scroll" href="#/assign">Assign</a></li>
                  </ul>
                </div>
              </div>
            </div>
          </div>
        </nav>
      </div>
    </header>

    <div class="page-banner no-spacing paralax" data-speed="2" style="background-image: url('images/banner.jpg');">
      <div class="bg-overlay no-spacing paralax">
        <div class="container header-container text-center">
            <h3>
                REST API for an issue tracker of a small team of developers
            </h3>
        </div>
      </div>
    </div>
    <div class="page-wrap" id="page-wrap">
      <div class="container">
        <div class="page-content">
          <div class="wrapper">
            Content will be displayed here
          </div>
        </div>
      </div>
    </div>
    <footer class="site-footer">
      <div class="container">
        <div class="row">
          <div class="col-md-8 col-sm-8 col-xs-12 col-lg-8">
            <div>
              <ul>
                <li><a class="page-scroll" href="#/home">Home</a></li>
                <li><a class="page-scroll" href="#/developer">Developers</a></li>
                <li><a class="page-scroll" href="#/bug">Bugs</a></li>
                <li><a class="page-scroll" href="#/story">Stories</a></li>
                <li><a class="page-scroll" href="#/assign">Assign</a></li>
              </ul>
            </div>
          </div>
        </div>
      </div>
    </footer>
  </body>
  <script type="text/javascript" src="./js/jquery-1.12.4.min.js"></script>
  <script type="text/javascript" src="./js/bootstrap.min.js"></script>
  <script type="text/javascript" src="./js/custom.js"></script>
</html>
Here is second commit for the initial web ui.
Now we need to create an AngularJs application file called ‘restapp.js’ in js folder.
//js/restapp.js

(function() {
    var app = angular.module('restapp', ['ngRoute']);

    app.config(['$routeProvider', function($routeProvider) {
        $routeProvider.
        when('/home', {
                templateUrl: 'partials/main.html',
                controller: 'MainController'
            })
            .otherwise({
                redirectTo: '/home'
            });
    }]);


    app.controller('MainController', ['$scope', function($scope) {

    }]);


    /** DEVELOPERS **/

    /** BUGS **/

    /** STORIES **/

    /** ASSIGNMENTS **/


})();
we also need to add angularjs functionality to our index.html file.
First change <html><html data-ng-app="restapp">
Then change
<div class="wrapper">Content will be displayed here</div>
<div class="wrapper" ng-controller="MainController">
  <ng-view></ng-view>
</div>
and add <script type="text/javascript" src="./js/restapp.js"></script>
after
<script type="text/javascript" src="./js/angular.min.js"></script>
<script type="text/javascript" src="./js/angular-route.js"></script>
<!--add restapp-->
<script type="text/javascript" src="./js/restapp.js"></script>
Finally we need to add an html page to display content in main page.
I will call this file main.html and I’ll save it into static/partials/ folder.
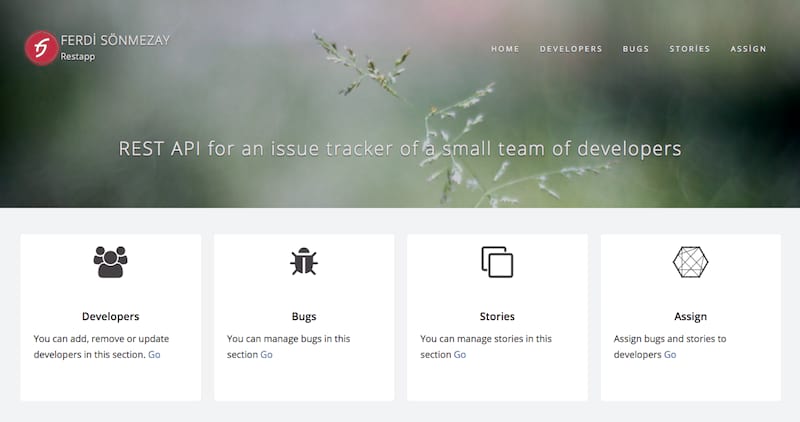
<div class="row">
    <div class="text-left col-sm-6 col-md-3 col-lg-3 col-xl-2 no-space" style="padding: 0px 10px;">
        <div class="thumbnail">
            <div class="text-center" style="font-size:36pt;">
                <i class="fa fa-users"></i>
            </div>
            <div class="caption" style="padding:20px;">
                <h5 class="post-caption text-center">
                    <a class="" href="#/developer">Developers</a>
                </h5>
                <p style="font-size:14px;">
                    You can add, remove or update developers in this section.
                    <a href="#/developer">Go</a><br><br>
                </p>
            </div>
        </div>
    </div>

    <div class="text-left col-sm-6 col-md-3 col-lg-3 col-xl-2 no-space" style="padding: 0px 10px;">
        <div class="thumbnail">
            <div class="text-center" style="font-size:36pt;">
                <i class="fa fa-bug"></i>
            </div>
            <div class="caption" style="padding:20px;">
                <h5 class="post-caption text-center">
                    <a class="" href="#/bug">Bugs</a>
                </h5>
                <p style="font-size:14px;">
                    You can manage bugs in this section
                    <a href="#/bug">Go</a><br><br>
                </p>
            </div>
        </div>
    </div>

    <div class="text-left col-sm-6 col-md-3 col-lg-3 col-xl-2 no-space" style="padding: 0px 10px;">
        <div class="thumbnail">
            <div class="text-center" style="font-size:36pt;">
                <i class="fa fa-clone"></i>
            </div>
            <div class="caption" style="padding:20px;">
                <h5 class="post-caption text-center">
                    <a class="" href="#/story">Stories</a>
                </h5>
                <p style="font-size:14px;">
                    You can manage stories in this section
                    <a href="#/story">Go</a><br><br>
                </p>
            </div>
        </div>
    </div>

    <div class="text-left col-sm-6 col-md-3 col-lg-3 col-xl-2 no-space" style="padding: 0px 10px;">
        <div class="thumbnail">
            <div class="text-center" style="font-size:36pt;">
                <i class="fa fa-connectdevelop" aria-hidden="true"></i>
            </div>
            <div class="caption" style="padding:20px;">
                <h5 class="post-caption text-center">
                    <a class="" href="#/assign">Assign</a>
                </h5>
                <p style="font-size:14px;">
                    Assign bugs and stories to developers
                    <a href="#/assign">Go</a><br><br>
                </p>
            </div>
        </div>
    </div>
</div>
now we can run our application mvn spring-boot:run and you should see this screen below.
Here is third commit for adding AngularJs to the project.
Section 3 : Implementing “Developers” Functionality
In this section there will be three layers in the application:
-
Controller Layer
-
Service Layer
-
Repository/Dao Layer
The requests from clients will be handled in controllers. Than service layer will make some bussiness logic operations, finally Dao or Repository Layer will handle database operations.
First I will create a package com.ferdisonmezay.issuetracker.entity for Entity classes. Then I’m going to create two Java Entity classes.
Our Developers will only have id and name attributes. But since every entity will have ìd attribute in this project, first I will create a class called BaseEntity.java, and extend this class from other entity classes.
Here is BaseEntity.java file:
package com.ferdisonmezay.issuetracker.entity;

import javax.persistence.Column;
import javax.persistence.GeneratedValue;
import javax.persistence.GenerationType;
import javax.persistence.Id;
import javax.persistence.MappedSuperclass;

@MappedSuperclass
public class BaseEntity {

  @Id
  @GeneratedValue(strategy = GenerationType.IDENTITY)
  @Column(name="ID")
  private Integer id;

  public Integer getId() { return id; }
  public void setId(Integer id) {	this.id = id; }
}
And here is DeveloperEntity.java class:
package com.ferdisonmezay.issuetracker.entity;

import javax.persistence.Column;
import javax.persistence.Entity;
import javax.persistence.Table;

@Entity
@Table(name="DEVELOPERS")
public class DeveloperEntity extends BaseEntity {

  @Column(name="name")
  private String name;

  public DeveloperEntity() {}
  public DeveloperEntity(String name) { this.name = name; }
  public String getName() { return name; }
  public void setName(String name) { this.name = name; }
}
Next, for database operations, I will create an interface, called DeveloperDao.java in the package com.ferdisonmezay.issuetracker.dao, which extends JpaRepository<EntityClass, Integer>.
package com.ferdisonmezay.issuetracker.dao;

import org.springframework.data.jpa.repository.JpaRepository;
import org.springframework.stereotype.Repository;
import com.ferdisonmezay.issuetracker.entity.DeveloperEntity;

@Repository
public interface DeveloperDao extends JpaRepository<DeveloperEntity, Integer> {

}
This class does not contain any functions, we will use methods from JpaRepository class.
In some applications there’s no need to add a service layer between the controller and Dao classes, but I will add this layer. Maybe some of you will want to add some bussiness logic in Service classes.
So here is the DeveloperService.java file, in com.ferdisonmezay.issuetracker.service package.
package com.ferdisonmezay.issuetracker.service;

import java.util.List;
import org.springframework.beans.factory.annotation.Autowired;
import org.springframework.stereotype.Service;
import com.ferdisonmezay.issuetracker.dao.DeveloperDao;
import com.ferdisonmezay.issuetracker.entity.DeveloperEntity;

@Service
public class DeveloperService{

  @Autowired
  private DeveloperDao developerDao;

  public DeveloperEntity add(String name) {
    DeveloperEntity developer = new DeveloperEntity(name);
    return developerDao.save(developer);
  }

  public List<DeveloperEntity> getDevelopers(){ return developerDao.findAll(); }
  public DeveloperEntity getById(Integer id) { return developerDao.findOne(id); }
  public DeveloperEntity update(DeveloperEntity developer) { return developerDao.save(developer); }
  public void delete(Integer developerId) { developerDao.delete(developerId); }
  public Long getDeveloperCount() { return developerDao.count(); }
}
Finally we need to create our RESTful services. To handle requests, I will create DeveloperController.java annotated with @RestController in the package com.ferdisonmezay.issuetracker.controller
package com.ferdisonmezay.issuetracker.controller;

import java.util.List;
import org.springframework.beans.factory.annotation.Autowired;
import org.springframework.web.bind.annotation.PathVariable;
import org.springframework.web.bind.annotation.RequestBody;
import org.springframework.web.bind.annotation.RequestMapping;
import org.springframework.web.bind.annotation.RequestMethod;
import org.springframework.web.bind.annotation.RestController;
import com.ferdisonmezay.issuetracker.entity.DeveloperEntity;
import com.ferdisonmezay.issuetracker.service.DeveloperService;

@RestController
@RequestMapping("/developer")
public class DeveloperController {

  @Autowired
  private DeveloperService developerService;

  @RequestMapping(value="list", method = RequestMethod.GET)
  public List<DeveloperEntity> getDeveloperList() {
    return developerService.getDevelopers();
  }

  @RequestMapping(value = "create", method = RequestMethod.POST)
  public DeveloperEntity create(@RequestBody String name) {
    return developerService.add(name);
  }

  @RequestMapping(value = "update/{id}", method = RequestMethod.PUT)
  public DeveloperEntity update(@RequestBody DeveloperEntity developer) {
    return developerService.update(developer);
  }

  @RequestMapping(value = "delete/{id}", method = RequestMethod.DELETE)
  public void delete(@PathVariable(value = "id") Integer developerId) {
    developerService.delete(developerId);
  }
}
Now we need to add CRUD operation functions for developers section to AngularJs file, which we called restapp.js
First add routing rule for developer url.
.when('/developer', {
      templateUrl: 'partials/developers.html',
      controller: 'DevelopersController'
  })
Then add DevelopersController and DevelopersService functionalities. to restapp.js file.
/** DEVELOPERS **/
app.controller('DevelopersController', ['$scope', 'DevelopersService', function($scope, DevelopersService) {

    function resetParams() {
        $scope.actionName = "New Developer";
        $scope.submitButtonLabel = "Insert";
        $scope.currentDeveloper = {
            id: null,
            "name": null
        };
        $scope.isFormClean = true;
        $scope.name = "";
    }

    function developerList() {
        DevelopersService.list()
            .then(function(response) {
                $scope.developers = response.data;
            });
    }

    function resetParamsAndLoadDeveloperList() {
        resetParams();
        developerList();
    }

    $scope.selectDeveloper = function(developer) {
        $scope.actionName = "Update Developer";
        $scope.submitButtonLabel = "Update";
        $scope.currentDeveloper = developer;
        $scope.name = $scope.currentDeveloper.name;
        $scope.isFormClean = false;
    };

    $scope.submit = function() {
        if ($scope.isFormClean) {
            $scope.insert($scope.name);
        } else  {
            $scope.currentDeveloper.name = $scope.name;
            $scope.update($scope.currentDeveloper);
        }
        resetParamsAndLoadDeveloperList();
    };

    $scope.insert = function(name) {
        DevelopersService.insert(name)
            .then(function(response) {
                resetParamsAndLoadDeveloperList();
            });
    };

    $scope.update = function(developer) {
        DevelopersService.update(developer)
            .then(function(response) {
                resetParamsAndLoadDeveloperList();
            });
    };

    $scope.delete = function(developerId) {
        DevelopersService.delete(developerId)
            .then(function(response) {
                resetParamsAndLoadDeveloperList();
            });
    };

    $scope.cancel = function() {
        resetParams();
    };

    resetParamsAndLoadDeveloperList();

}]);

app.service('DevelopersService', function($http) {
    var service = this;
    var path = '/developer/';

    function getPath() {
        return path;
    }

    function getUrl(action) {
        return getPath() + action;
    }

    service.list = function() {
        return $http.get(getUrl('list'));
    };

    service.insert = function(name) {
        return $http.post(getUrl('create'), name);
    };

    service.update = function(developer) {
        return $http.put(getUrl('update/' + developer.id), developer);
    };

    service.delete = function(id) {
        return $http.delete(getUrl('delete/' + id), {
            'id': id
        });
    };
});

/** BUGS **/
Finally add an html file in partials folder called developers.html to display developer list and make CRUD operations on developers.
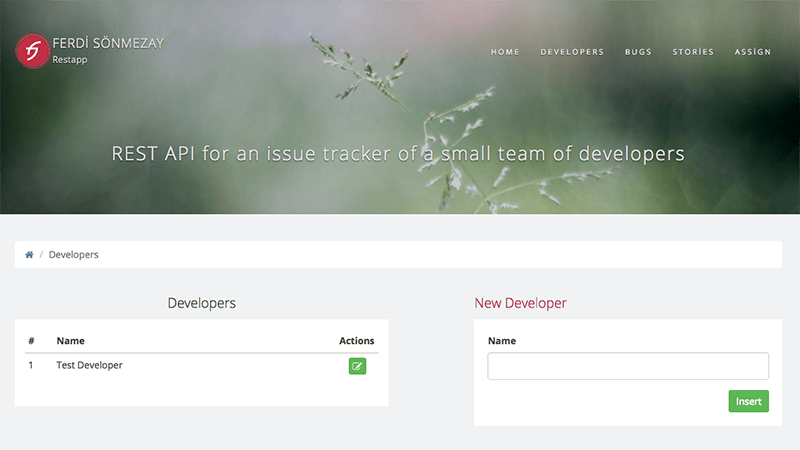
<ol class="breadcrumb">
  <li><a href="#/home"><i class="fa fa-home" aria-hidden="true"></i></a></li>
  <li class="active">Developers</li>
</ol>

<div class="row" data-ng-controller="DevelopersController">
  <div class="col-md-6">
    <h4 class="text-center">Developers</h4>
    <div class="white-background" style="padding:15px;">
	    <table class="table table-hover table-condensed">
	      <thead>
	        <tr>
	          <th>#</th>
	          <th>Name</th>
	          <th>Actions</th>
	         </tr>
	      </thead>
	      <tbody>
	        <tr ng-repeat="developer in developers" ng-class="(developer.id == currentDeveloper.id) ? 'warning' : ''">
	          <td></td>
	          <td width="80%"></td>
		        <td  width="5%" style="text-align:center;">
	            <a class="btn btn-xs btn-success" ng-click="selectDeveloper(developer)"><i class="fa fa-pencil-square-o "></i></a>
		        </td>
	         </tr>
	      </tbody>
	    </table>
    </div>
  </div>
  <div class="col-md-1"></div>
  <div class="col-md-5">
    <h4 style="color:#B80D57;"></h4>
    <div class="white-background" style="padding:20px;">
    <form name="developerForm" ng-submit="submit()" method="POST">
      <div class="row">
        <div class="col-md-12">
          <div class="form-group">
            <label class="control-label" for="name">Name</label>
            <input value="" name="name" id="name" type="text" ng-model="name" placeholder="" class="form-control">
          </div>
        </div>
      </div>
      <div class="row">
        <div class="col-md-12 text-right">
          <input class="btn btn-success btn-sm" type="submit" id="submit" value="" />
          <a ng-if="currentDeveloper.id" ng-click="delete(currentDeveloper.id)" class="btn btn-danger btn-sm">Delete</a>
          <a ng-if="currentDeveloper.id" ng-click="cancel()" class="btn btn-default btn-sm">Cancel</a>
        </div>
      </div>
    </form>
    </div>
  </div>
</div>
After the latest changes, when you click on “DEVELOPERS” link, you should be seeing the screen below.
Here is next, commit for adding developer crud operations.
Swagger Rest API Documentation
Please see SwaggerConfig.java file for Swagger rest api documentation.
You can view API documentation and test the API by swagger-ui, which you can access from : http://localhost:8080/swagger-ui.html after you run the application.
Data Initialization and Storage
Initial data are loaded into application from import.sql file. This application uses HSQLDB as database, when you start the application, all scripts from the specified file are executed, and data is imported to the application.
Note: When you stop the application, data that you inserted using the UI will be lost.
Summary
In this tutorial I’ve created a spring boot application, and explained how to create a java web application with Spring framework and AngularJs.
Tutorial contains only “Developers” section, which you can add, update, delete and view developers. I’ve also added functionality for creating, updating and deleting bugs and stories. There’s also a page to auto-assign stories to developers.
You can get the latest source from Github.